I thought I’d share a few tips and tricks that I’ve picked up along the way with SQL Server Management Studio. These are some of the features which I’ve found to be useful, but
which are perhaps less well known. I’ve not included any T-SQL features as this article is specifically about SSMS. These are my top features but if you regularly use
SSMS I'm sure you will know of at least some of these, I'd also be interested to know of any other useful features that you use. Please reply in the comments section
below if you can add any other tips.
1. Splitting the Query Window
I've already covered this in another article (see :
Splitting the query window in SQL Server Management Studio) but the query window in SSMS can be split into two so that you can
look at two parts of the same query
simultaneously. Both parts of the split window can be scrolled independently. This is especially useful if you have a large query and want to compare different
areas of the same query. To split the window simply drag the bar to the top right hand side of the window as shown below.
This leads onto to another feature which is especially useful for larger queries, which is line numbers :
2. Adding Line Numbers
It can be useful to add line numbers to the query window, especially for larger queries. To switch on the display of line numbers click on the
Tools -> Options menu item. In the dialog box that appears click on
Text Editor and then
Transact-SQL in the left hand pane and check the
Line numbers check box in the right hand pane.

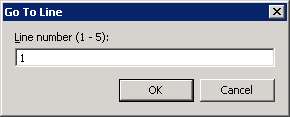
Line numbers will then appear in each query window. You can also go to a specific line number by pressing CTRL + G which will open the Go To Line dialog :
3. Moving columns in the results pane
It may not be immediately obvious but you can switch columns around in the results pane when using the grid view, by dragging the column headers
and dropping them next to another column header. This can be useful if you want to rearrange how the results are displayed without amending the query,
especially if you have a lot of columns in your resultset.
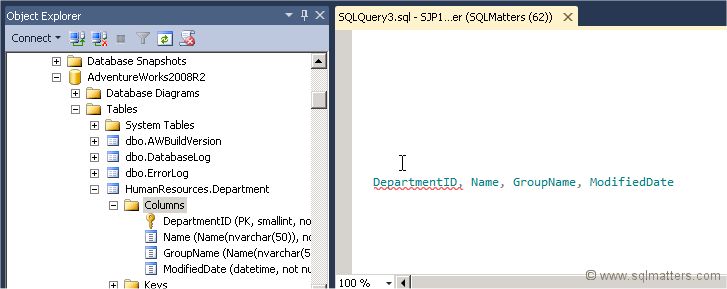
4. Dragging a comma separated list of all Columns in a Table from Object Explorer window to the Query Window
If you want to list all the columns in a table as a comma separated list (perhaps as the starting point for a SELECT clause) simply drag the
‘Columns’ item in Object Explorer and drop it onto to a query window. A list of all columns separated by commas will be displayed in the
query window, as shown below.
5. Using GO X to Execute a Batch or Statement Multiple Times
The ‘GO’ command marks the end of a batch of statements that should be sent to SQL Server for processing, and then compiled into a single execution plan.
By specifying a number after the ‘GO’ the batch can be run specified number of times. This can be useful if, for instance, you want to create test data by
running an insert statement a number of times.
Note that this is not a Transact SQL statement and will only work in Management Studio (and also SQLCMD or OSQL).
For instance the following SQL can be run in SSMS :
CREATE TABLE TestData(ID INT IDENTITY
(1,1), CreatedDate DATETIME)
GO
INSERT INTO TestData(CreatedDate) SELECT GetDate()
GO 10
This will run the insert statement 10 times and therefore insert 10 rows into the TestData table. In this case this is a simpler alternative than creating a cursor or while loop.
6. Selecting a block of text using the ALT Key
By holding down the ALT key as you select a block of text you can control the width of the selection region as well as the number of rows. There are a couple of
situations where I’ve found this to be very useful. The first is to delete a block of text, for instance if you want to delete all the schema/table references
in the column list below, simply highlight the table references while pressing the ALT key, so that the text shown below is highlighted.
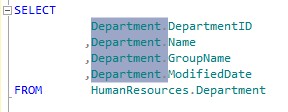
Then press the delete key to delete the block :

This can also be used to replace or insert a block of text. For example to add the schema reference back in, block select a column of zero width by
pressing the ALT key and selecting an area 4 rows high and zero columns wide immediately before the column names. The selection will be indicated
by a pale grey line as shown below :
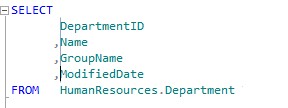
Any text you now type will appear in all four rows simultaneously. In the screenshot below I’ve typed in ‘Department.’ :
7. Colour coding of connections
SQL Server Management Studio has the capability of colouring the bar at the bottom of each query window, with the colour
dependent on which server is connected. This can be useful in order to provide a visual check of the server that a query is to be
run against, for instance I like to colour code production instances as red, development as green and amber as test. This can also be used
in conjunction with Registered Servers and CMS (Central Management Server).
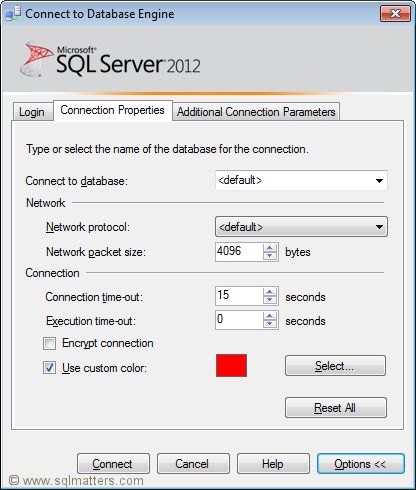
To add a colour bar when connecting to the server click on the
Options button in the
Connect to Database Engine window
and then select the
Connection Properties window. Select the check box towards the bottom of the window and
use the ‘Select…’ button to choose a colour.
That colour is then associated with the connection and is used to colour the panel at the bottom of the query window :
8. SQLCMD mode
Switching on SQLCMD mode enables a number of useful extra scripting style commands in SSMS. In particular you can use it to change to the
connection credentials within the query window, so that you can run a query against multiple servers from the same query window. There are
more details of how to do this here :
Changing the SQL Server connection within an SSMS Query Windows using SQLCMD Mode
9. Registered Servers / Central Management Server
If you have a lot of servers then re-entering the details in Object Explorer every time you start SSMS can be frustrating and time consuming.
Fortunately there are two facilities within SSMS that enable these details to be entered just once and “remembered” each time you open up SSMS.
These two facilities are Registered Servers and Central Management Servers. These were introduced in different versions of SQL Server and work
in different ways, each has its own advantages and disadvantages so you may want to use both.
To add a registered server open the
Registered Servers window from the
View menu (or click CTRL + ALT + G), the window should appear in
the top left corner of SSMS. Right click on the Local Server Groups folder and select ‘New Server Registration…’. Enter the server details
and close the window. This new server should then appear under Local Server Groups, you can then right click and open up the server in Object
Explorer or open a new query window. The server details are stored locally in an XML file and so will appear next time you open SSMS. If you
have a lot of servers then you can also create Server Groups to group together similar servers. One advantage of creating groups (other than
being able to logically group similar servers together) is that you can run a query against all servers in the group, by right clicking the
group and selecting ‘New Group’.
Central Management Server are similar to Registered Servers but with some differences, the main one being that the server details are
stored in a database (the Central Management Server) rather than a local file. A significant limitation with CMS is that the CMS server
itself can’t be included in the list of servers.
There are some differences in capabilities between Central Management Servers and Registered Servers so you may want to investigate that
before choosing which system to use, or (as I mentioned above) use both. A brief summary of the differences is below :
| Item | Registered Servers | Central Management Server |
| Method for storing connections | Local XML file | SQL Server (msdb database) |
| Visibility | Current user only | All users (subject to being given access permissions) |
| Types of connections accessible | SQL, SSAS, SSIS, SSRS | SQL only |
| Authentication | Windows and SQL Server | Windows only |
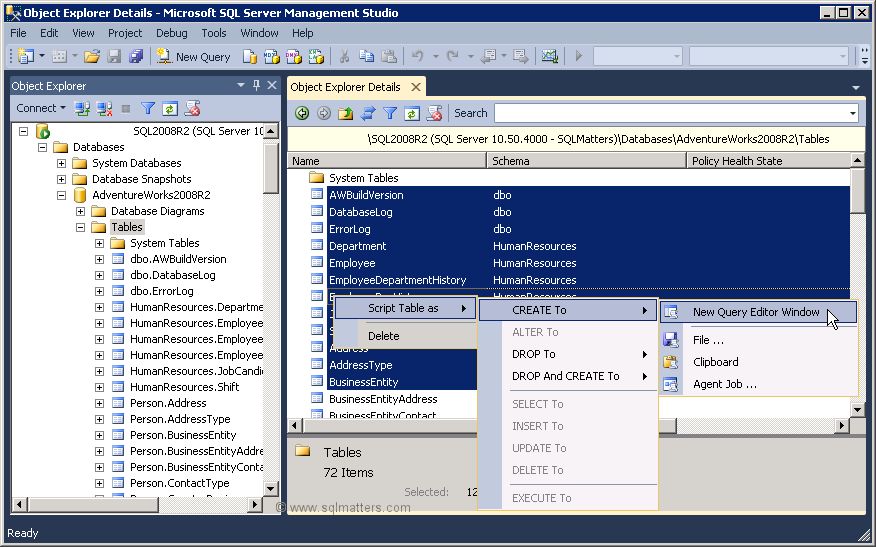
10. Script multiple objects using the Object Explorer Details Windows
Individual database objects, such as a table or stored procedure, can be scripted within SSMS by right clicking on the object within
Object Explorer and selecting the appropriate item in the drop down menu. However if you have a lot of objects to script that can quickly
become time consuming. Fortunately it’s possible to select multiple objects and script them up all together in a single query window. To do
this just open the
Object Explorer Details window from the
View menu (or press the F7 key).
If you want to script up multiple (or all) tables, select the
Tables item under the relevant database in Object Explorer. A list of all
tables appears in the
Object Explorer Details window. Select the tables you want to script (using the Control key if necessary) and then
right click and select which script option you want – e.g. to create a table create script for all tables. This is shown in the screenshot below :