I’ve been writing some insert and select SQL statements for some very wide tables. Microsoft’s Intellisense is normally a great
help here, and can save quite a bit of typing. However some of the tables had a 100+ columns and the effort involved in typing
those in names would have been large, even with Intellisense’s assistance. My other trusted technique of generating a create
table script in Management Studio and modifying that would also have taken a lot of editing.
As a developer my mind naturally wondered towards techniques for automating this process and I came up with three methods,
though I’m sure there are many more.
First Method - Using Management Studio
By default SQL Server displays the results of a query as a grid. However by tweaking Management Studio’s settings the column
headers, along with the data, can be displayed as a comma separated list. We’re not interested in the data but by generating
an empty resultset we can create a comma separated list of column names, ready for copying into a query.
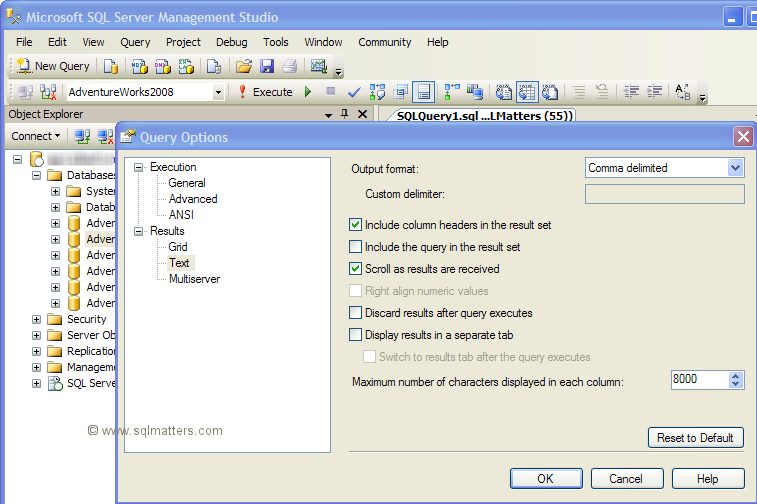
To do this select the ‘Query Options...’ dialog from the Query menu. Select ‘Text’ under ‘Results’ in the left hand pane.
In the Output Format dropdown select ‘Comma Delimited’ as shown in the screenshot below.
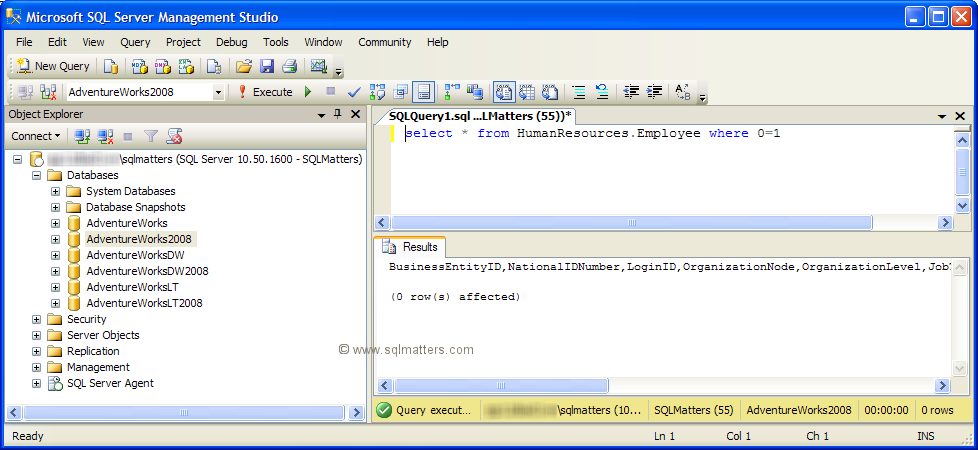
The final step is to actually set the results to display as text, by selecting ‘Query’ / ‘Results To’ from the menu and
selecting the ‘Results To Text’ menu item. Once that’s done write a simple ‘select * from table’ query to display column
headers in the Results pane, ready for copying and pasting, as below.
Second Method – Using Management Studio 2008
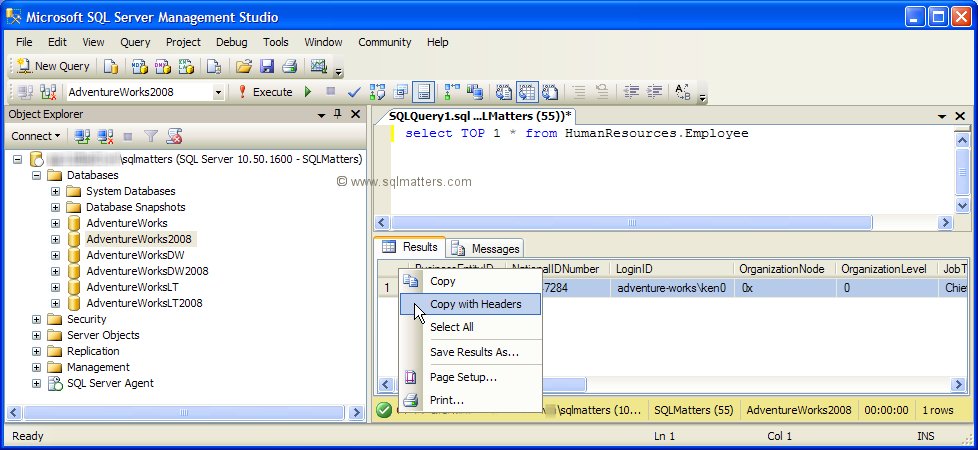
The next method only works with SQL Server 2008 Management Studio as it uses a new feature. Write a query to
display the data in the table using the default grid layout, left click in the top left corner of the Results
pane to select all the results, then right click and select the ‘Copy with Headers’ menu option. You can
see that in the screenshot below.
Next fire up Excel and paste the results into a new spreadsheet. The column header and data are pasted in,
with one table column per spreadsheet column. You can delete the data rows as we don’t need that, and then
save the spreadsheet as a csv file. Open the csv file in notepad or similar to see the csv column headers. OK,
I’ll admit that this technique isn’t hugely different from the previous one, but is an alternative which
some may prefer.
Third Method – Write Some SQL Code
As a developer writing code generally seems more attractive than almost any other solution. There
are a number of scripts available that will script up the csv column list, usually using information
from the system tables. There is even a script available on this site which will also work with
older versions of SQL Server.
I won’t repeat the script here, but will just refer you to the link :
Creating a comma separated list of all columns in a table